
 AI Document Summary
This document covers the back-end portal workflow for building out a food and beverage operation in SnowCloud. It walks operations and customer success teams through creating location containers, configuring an F&B shop, setting up POS/KDS/tables/pickup spots, building the online menu, and mapping inventory to the correct KDS so the operation is fully ready for service in the Operator App.
Creating Location Containers For Food And Bev #
Before a food and beverage shop can be created, its location must exist in the system. Locations are structured as containers, with a parent container for the overall F&B operation and child containers for each individual restaurant.
To create the location containers:
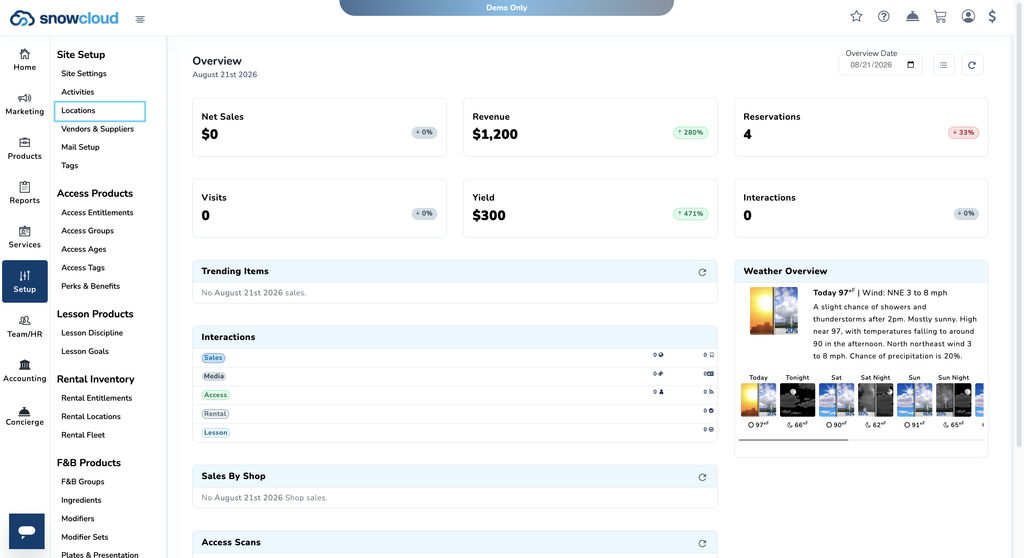
- From the left-side menu, select Setup
- Under Site Setup, select Locations
- Right-click on the location tree and select Location Container
- Create the Food and Beverage parent folder
- Right-click on the Food and Beverage folder just created and add another location container underneath it
- Name the child container after the specific restaurant, and set its parent location to the Food and Beverage folder created in the previous step
Note for operations teams: The parent-child location structure supports multiple restaurants rolling up under a single F&B operation. Use consistent naming conventions so restaurants can be easily identified in reporting and shop configuration.
Creating A Food And Bev Shop #
With the location container in place, the F&B shop itself can now be created. The shop is what the frontline team will see and select in the Operator App.
To access the shop creation interface:
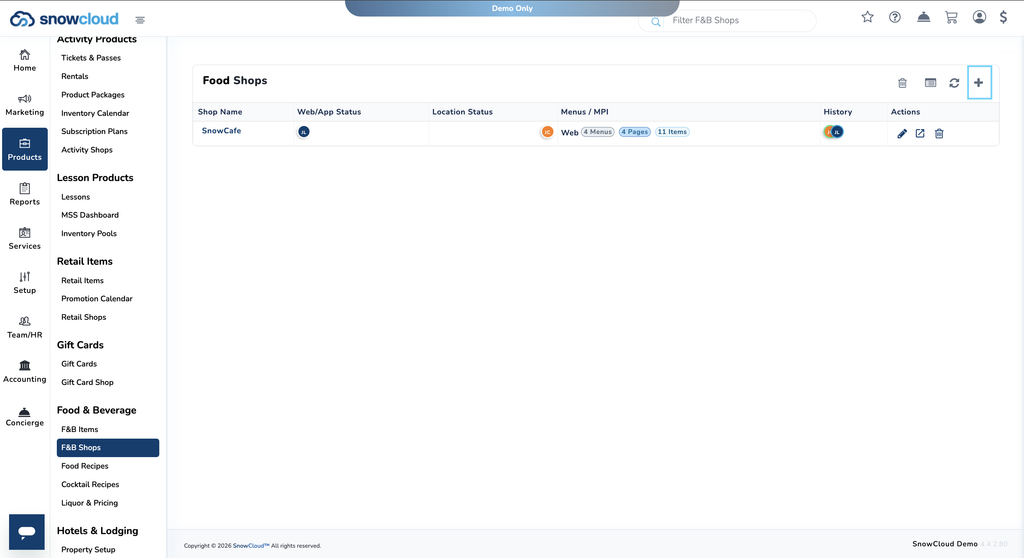
- From the left-side menu, select Products
- Under Food & Beverage, select F&B Shops
- You will see a list of any existing shops
- Press the plus (+) button in the top-right corner of the screen to create a new shop
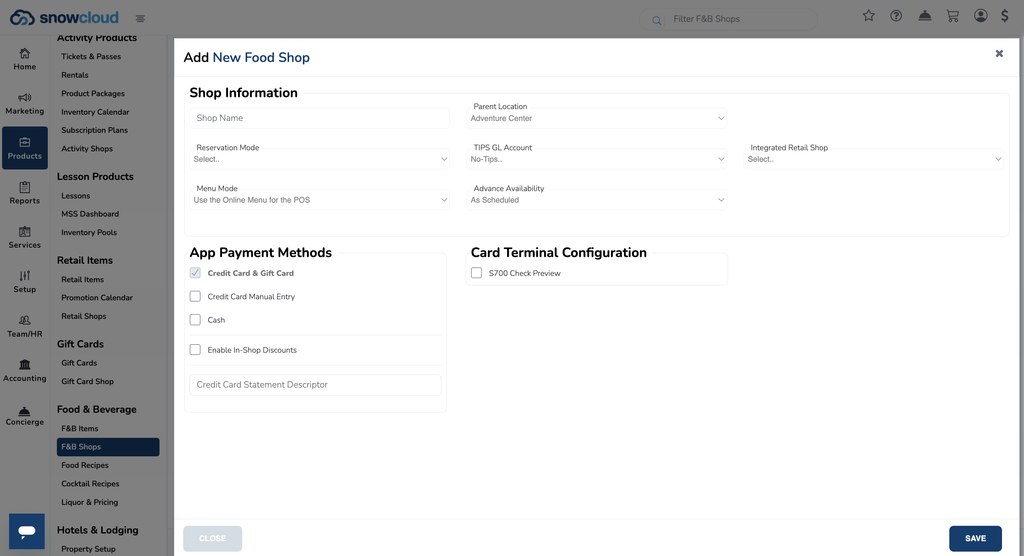
To configure the new shop, fill in the following fields:
Shop Name #
Enter the name of the new shop in the Shop Name field.
Parent Location #
Select the specific restaurant location container created in Section 2. This nests the shop within an existing location.
Note for operations teams: If this is the first shop being created and no location container exists yet, the default value of Root Location can be used. However, using a dedicated parent location container (as described in Section 2) is recommended for reporting and organization.
Reservation Mode #
Select how the shop handles reservations. Options include:
- Dining / Table Reservations — for shops that accept reservations for dining or table service
- Pickup-Time Reservations — for shops that accept reservations for pickup at a specific time
- Walk-in Only — for shops that only accept walk-in customers
TIPS GL Account #
If the location accepts tips, use the TIPS GL Account field to configure the accounting GL code. This ensures that tips are properly accounted for in financial records.
Menu Mode #
Select how the shop’s menu will be handled. Options include:
- Use the Online Menu for the POS — the shop uses the same menu for both online orders and in-person POS transactions
- Use Different Menu Online and in the POS — the shop has separate menus for online orders and in-person POS transactions
- No Online Menu, POS Only — the shop does not have an online menu and uses a menu for in-person POS transactions only
Payment Method #
Select the payment methods accepted at the shop.
Additional Fields #
Depending on your SnowCloud configuration, additional fields may be available. Fill these out as needed based on your operational requirements. Refer to the Food and Beverage Shop Settings Reference documentation for more detail on optional fields.
To finish creating the shop:
- Confirm all required fields are filled in
- Select Save at the bottom-right of the screen
Once saved, the shop will be created and available for further configuration through the shop config screen.
Configuring POS, KDS, Tables & Pickup Spots #
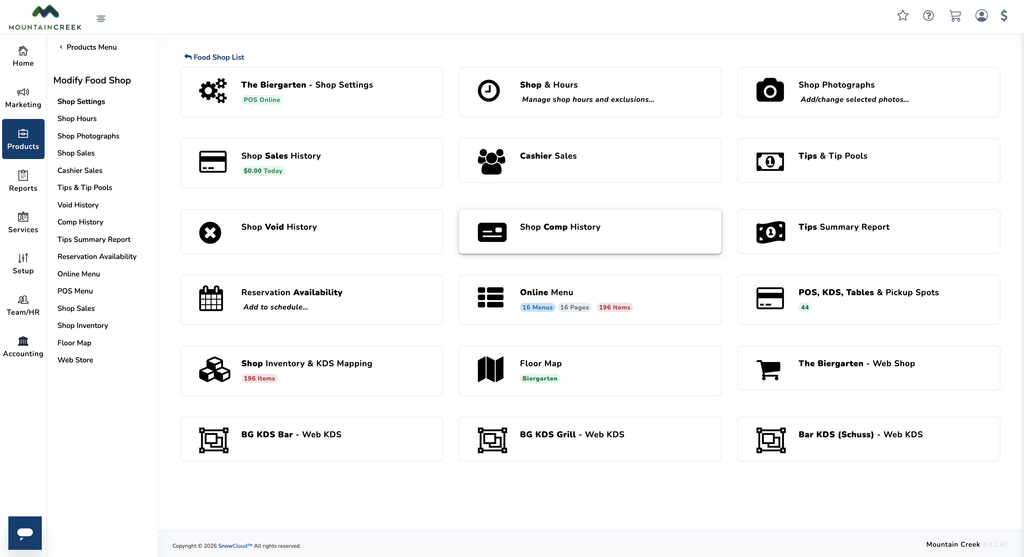
From the shop config screen, the POS, KDS, Tables & Pickup Spots section is where the physical and digital infrastructure of the restaurant is built out.
To configure the shop infrastructure:
- From inside the shop config screen, select POS, KDS, Tables & Pickup Spots
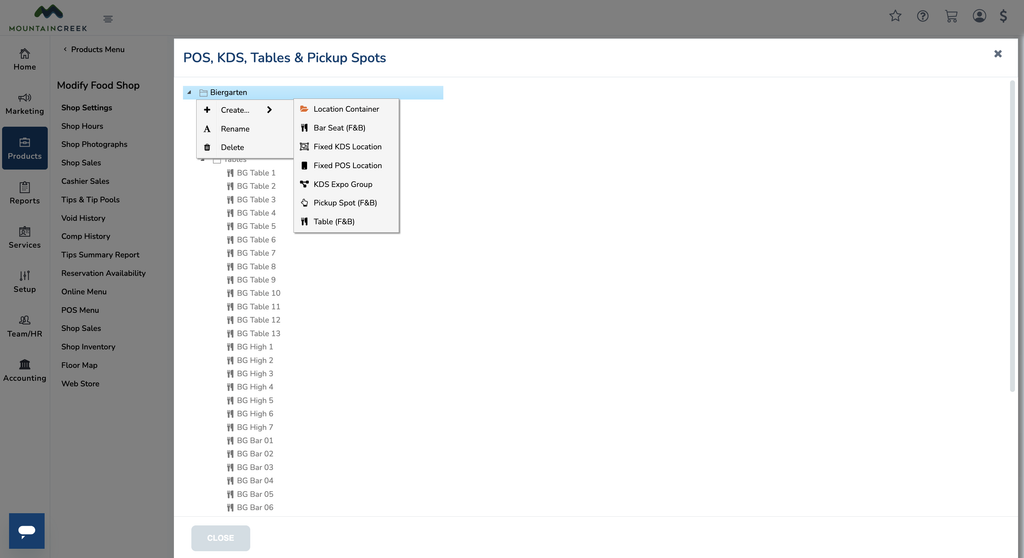
- Right-click on the restaurant location container to add the following as needed:
- Tables
- Pickup Locations
- KDS (Kitchen Display Screens)
- POS
POS Configuration Options #
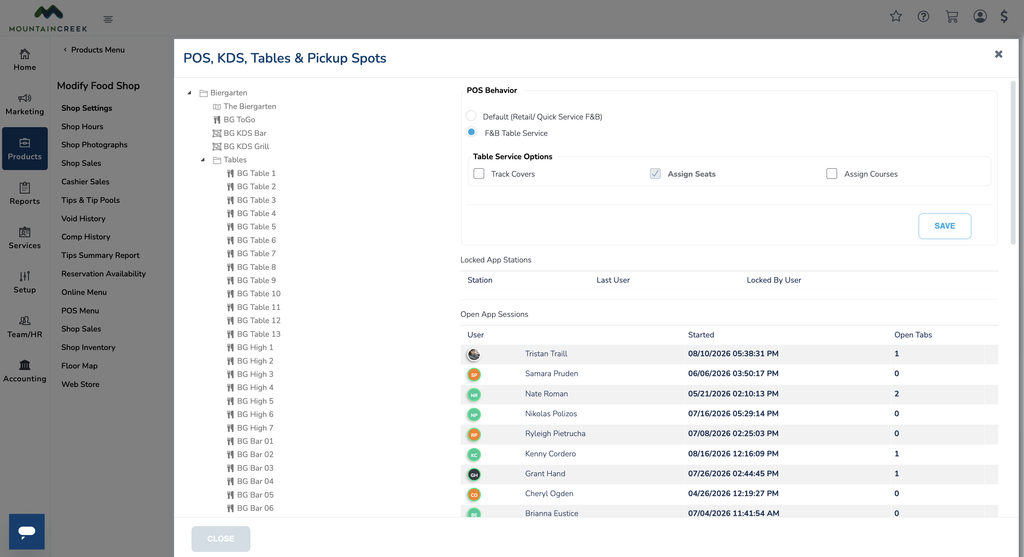
When adding a POS, additional configuration options are available:
- Quick Service Only — POS is limited to quick-service functionality
- Table Service — POS supports full table service workflows
If Table Service is selected, additional options become available:
- Seating Options
- Coursing Options
Note for operations teams: Add KDS units in this section before mapping menu items to them in the shop inventory step. Items cannot be mapped to a KDS that has not yet been created.
Building The Online Menu #
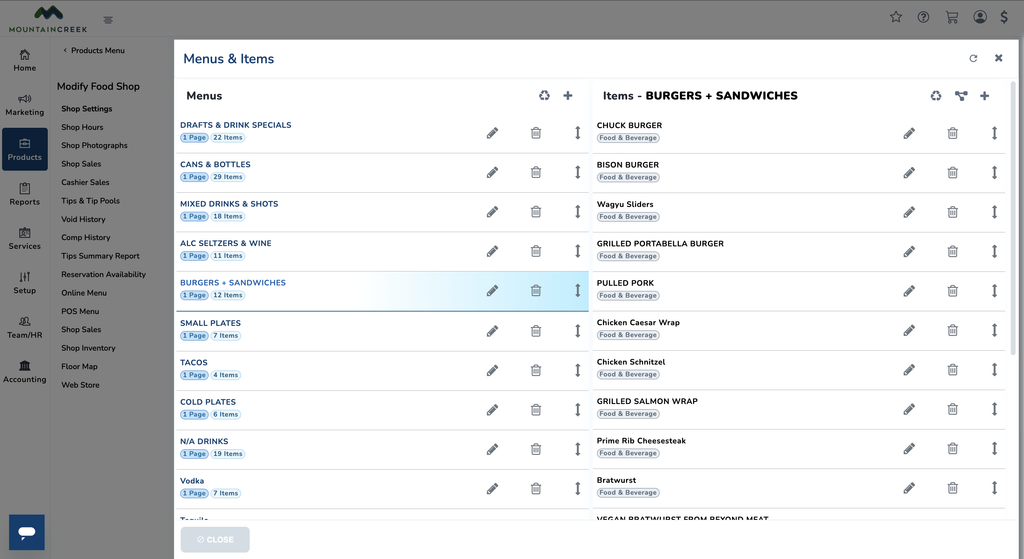
The Online Menu section is where menuing groups and their items are configured. These groups appear as quick-access tabs at the top of the POS screen in the Operator App, giving frontline team members fast access to different menu categories when adding items to a check.
To build the online menu:
- From the shop config screen, select Online Menu
- Press the plus (+) button in the top-right corner
- Create menuing groups based on the categories your restaurant needs
Examples of menuing groups:
- Drinks
- Specials
- Appetizers
- Entrees
To add items to a menuing group:
- Once a group is created, locate the Items section next to it
- Add any previously created F&B items to the group
Note for operations teams: Menuing groups should mirror how frontline team members think about the menu — grouping items by category, use case, or sales frequency. Well-organized menus significantly speed up order entry during high-volume periods.
Mapping Shop Inventory To KDS #
The Shop Inventory & KDS Mapping section is where each individual item is assigned to the KDS unit it will fire to when an order is sent from the Operator App POS.
To map inventory to a KDS:
- From the shop config screen, select Shop Inventory & KDS Mapping
- For each item, assign the KDS created in Section 4 that it should fire to
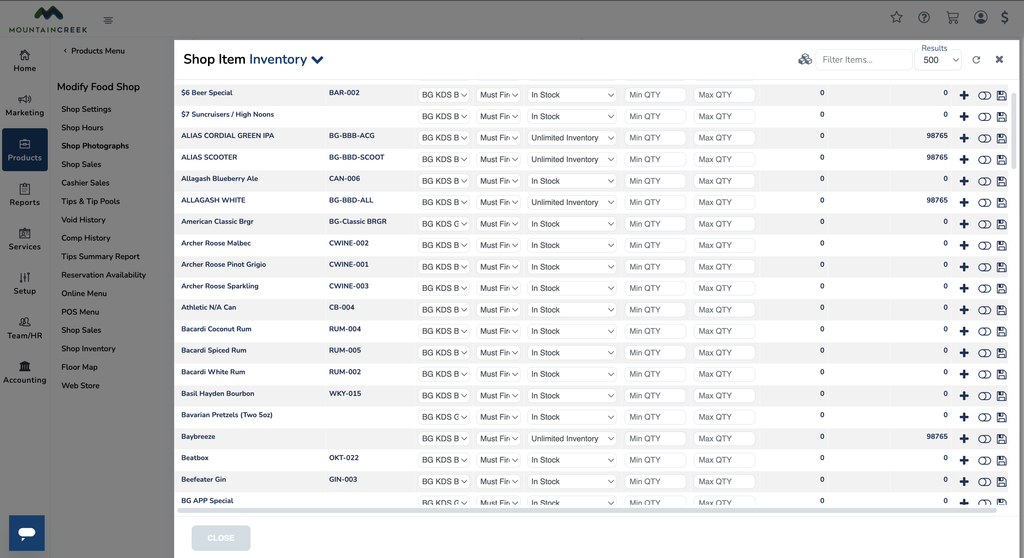
Important: Every item must be mapped to a KDS for orders to fire correctly. Items that are not mapped will not appear on any kitchen display when fired from the POS. Confirm all items are mapped before opening the shop for service.
Additional Shop Metrics And Reports #
The shop config screen also provides access to a range of reporting and management tools for ongoing operational visibility. Available sections include:
- Shop Settings — general shop configuration and POS online status
- Shop & Hours — manage shop hours and exclusions
- Shop Photographs — add or change selected photos
- Shop Sales History — daily and historical sales tracking
- Cashier Sales — sales tracking by cashier
- Tips & Tip Pools — tip management
- Shop Void History — record of voided items
- Shop Comp History — record of comped items
- Tips Summary Report — consolidated tips reporting
- Reservation Availability — schedule management for reservations
- Floor Map — visual layout of the restaurant
- Web Shop — online ordering configuration
- Web KDS — remote KDS access
Note for operations teams: These metrics and reports are available for ongoing operational review. Use them to monitor daily performance, reconcile session totals, and audit voids, comps, and tip distribution.