
 AI Document Summary
This document covers the foundational portal configuration steps for new SnowCloud implementations. It walks operations and customer success teams through site settings, payment processing, general ledger setup, taxes and fees, and product classifications.
Site Settings #
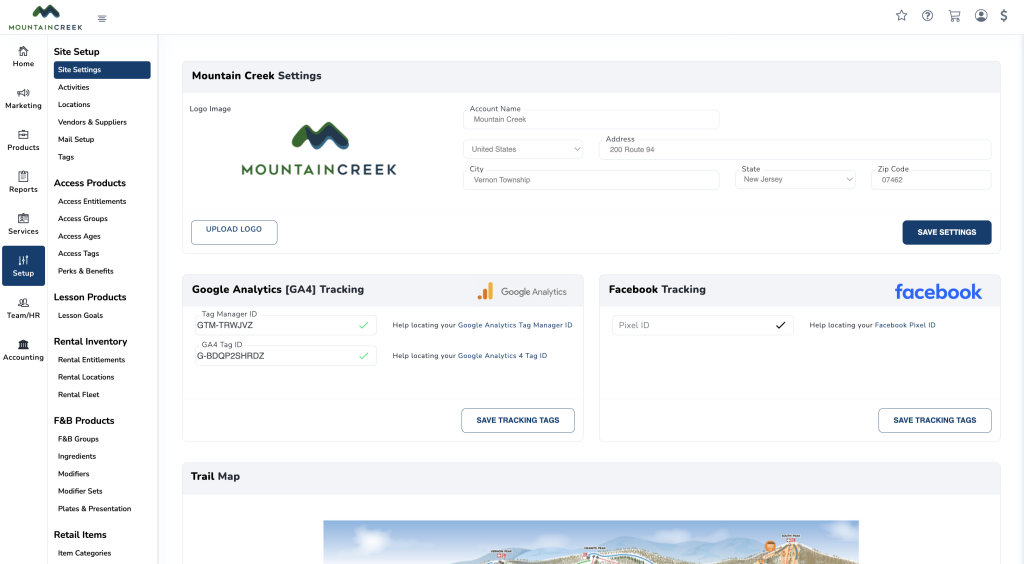
Site settings are the foundational configuration for the operation — account identity, branding, tracking integrations, and guest-facing visual assets.
To navigate to Site Settings:
- From the left-side menu, select Setup
- Select Site Settings
You will land on the Site Settings page, where account information, tracking integrations, and other core configurations can be updated.
Account Information & Logo #
The top of the Site Settings page is where the account’s foundational information is configured. This information represents the operation across the platform.
To configure account information:
- Upload the account logo
- Enter the account name
- Enter the address
- Select Save
Note for operations teams: The account logo appears across guest-facing surfaces such as the eStore and emailed receipts. Use a high-resolution image that reflects the operation’s brand.
Google Analytics GA4 Tracking #
Google Analytics tracking allows the operation to monitor guest activity across its digital surfaces. SnowCloud supports Google Analytics 4 (GA4) through Google Tag Manager.
To configure GA4 tracking:
- Enter the Tag Manager ID
- Enter the GA4 Tag ID
- Select Save Tracking Tags
Note for operations teams: Two helpful prompts are available on-screen if the Tag Manager ID or GA4 Tag ID cannot be located. Use these prompts to walk through where to find each value in your Google Analytics setup.
Facebook Tracking #
Facebook tracking allows the operation to monitor guest activity for advertising and audience insights through the Meta Pixel.
To configure Facebook tracking:
- Enter the Pixel ID
- Select Save Tracking Details
Note for operations teams: A helpful prompt is available on-screen if the Pixel ID cannot be located. Use this prompt to walk through where to find your Pixel ID in Meta Business Suite.
Uploading a Trail Map #
The trail map is the visual representation of the operation’s terrain, displayed across guest-facing surfaces where relevant.
To upload a trail map:
- Locate the Trail Map section on the Site Settings page
- Upload the trail map image file
- Select Save
Note for operations teams: Use a high-resolution trail map file so it remains clear when displayed to guests across different screen sizes.
Setting Up SnowPay #
SnowPay is SnowCloud’s built-in payment processing system, powered by Stripe. Before an operation can accept payments through SnowCloud, SnowPay must be set up and a bank account linked.
Completing the SnowPay Account Setup #
To access and begin SnowPay setup:
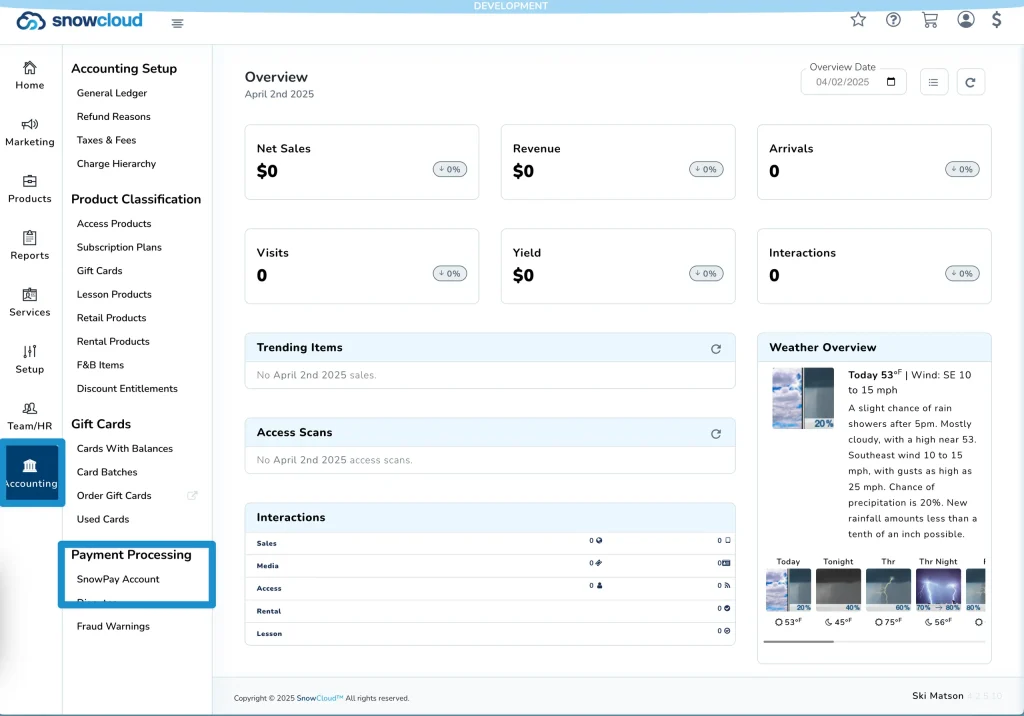
- From the left-side menu, select Accounting
- Under the Payment Processing section, select SnowPay Account
- Select Begin to start setup
To complete the SnowPay account setup:
- Use the Country dropdown to select your country, then select Next
- You will be redirected to Stripe — use the Type of Business dropdown to select your business type, then select Continue
- Complete the required business information fields, which may include:
- Legal Business Name
- Tax ID
- Address
- Select Continue to proceed
- Enter your Website, then select Continue
- Review all information provided
- Select Agree and Submit to complete the account setup
Adding a Bank Account #
After completing the initial setup on Stripe, you will be returned to the SnowPay page in SnowCloud.
To add a bank account:
- Select Add Bank on the SnowPay page
- Enter your bank account information
- Select Save
Note for operations teams: Bank account information can be updated at any time by navigating to Accounting → SnowPay in the portal.
Creating General Ledger Accounts #
General Ledger (GL) accounts are used to track financial transactions across SnowCloud. GL codes are the foundation of accounting configuration — they are attached to product classifications, taxes, fees, and other financial elements throughout the portal.
Understanding General Ledger Types #
Before creating any new GL codes, it’s important to understand the different types available in SnowCloud. GL types include:
- Accrual Account — tracks revenue and expenses recognized when earned or incurred, regardless of when cash is exchanged
- Cash Account — tracks cash transactions
- Coupon Liability Account — tracks the value of coupons that have been issued but not yet redeemed
- Gift Card Liability Account — tracks the value of gift cards that have been issued but not yet redeemed
- Tax/Fee Account — tracks taxes and fees collected on transactions
- Tips Liability Account — tracks tips that have been collected but not yet distributed
- Voucher Liability Account — tracks the value of vouchers that have been issued but not yet redeemed
Creating a New General Ledger Code #
In addition to the example GL codes provided within SnowCloud, custom codes can be created to track specific transactions.
To create a new GL code:
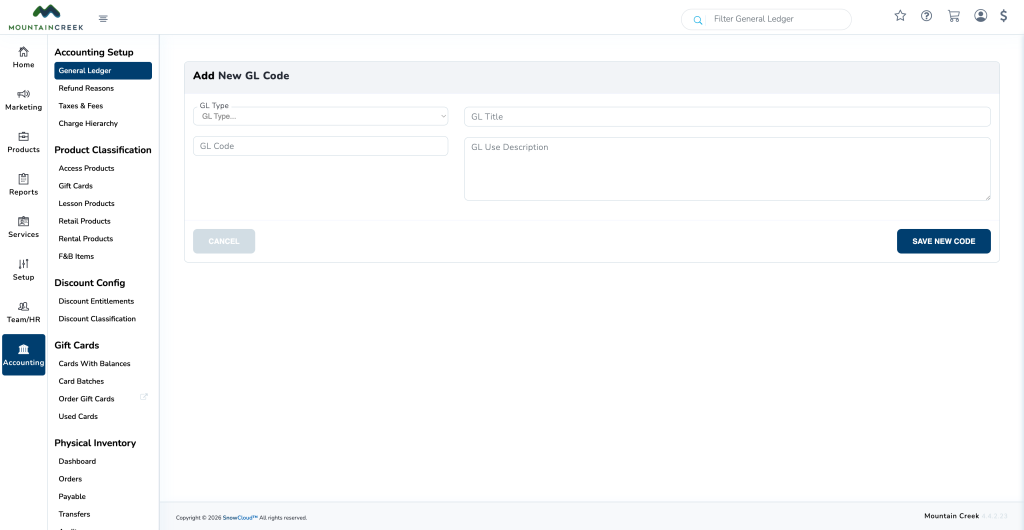
- From the left-side menu, select Accounting
- Select General Ledger
- Press the plus (+) button in the top-right corner
- Fill in the following fields:
- GL Type — select the type of code from the dropdown
- GL Code — enter a unique code for the new account
- Title (optional but recommended)
- Description (optional but recommended)
- Select Save New Code
Important: GL code formatting is entirely up to the operation. Confirm the code structure with your accounting team before adding new codes — inconsistent formatting will complicate reporting and reconciliation.
Configuring Taxes and Fees #
Taxes and fees are configured to ensure accurate accounting on every transaction. Each tax or fee can be applied as a fixed amount or as a percentage of the transaction.
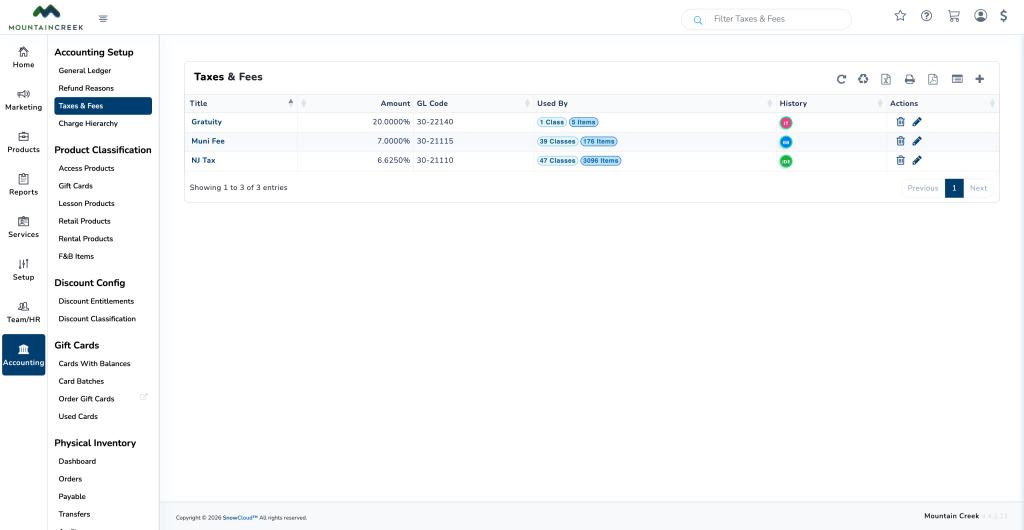
To create a new tax or fee:
- From the left-side menu, select Accounting
- Under the Accounting Setup section, select Taxes & Fees
- Press the plus (+) button in the top-right corner to create a new entry
- Fill in the following fields:
- Tax/Fee Type — select Tax or Fee from the dropdown
- GL Code Link — select the General Ledger account associated with this tax or fee (see Section 3 if the code has not been created yet)
- Charge Type — select whether the charge is a fixed amount or a percentage of the transaction
- Amount — enter the fixed amount or percentage value
- Title — the name of the tax or fee
- Select Save New Tax/Fee
Note for operations teams: Taxes and fees apply to product prices at checkout. Confirm the correct GL code is linked so revenue from taxes and fees is properly tracked in reporting.
Creating Product Classification #
Product classifications are used to categorize products in SnowCloud, allowing similar products to be grouped together for reporting purposes. For example, you might create a classification for Lift Tickets and another for Rentals.
Understanding Product Types #
Before creating any new product classifications, it’s important to understand the different product types available in SnowCloud. Each classification must be created under the appropriate product type. Product types include:
- Access Products — grant access to specific areas or activities (for example, lift tickets or trail passes)
- Subscription Plans — recurring services or access (for example, season passes or memberships)
- Gift Cards — sell gift cards redeemable for products or services
- Lesson Products — sell lessons or classes at the operation
- Retail Products — sell physical goods at the operation
- Rental Products — rent equipment or gear at the operation
- F&B Products — sell food and beverage items at the operation
- Discount Entitlements — offer discounts on products or services
Creating a New Product Classification #
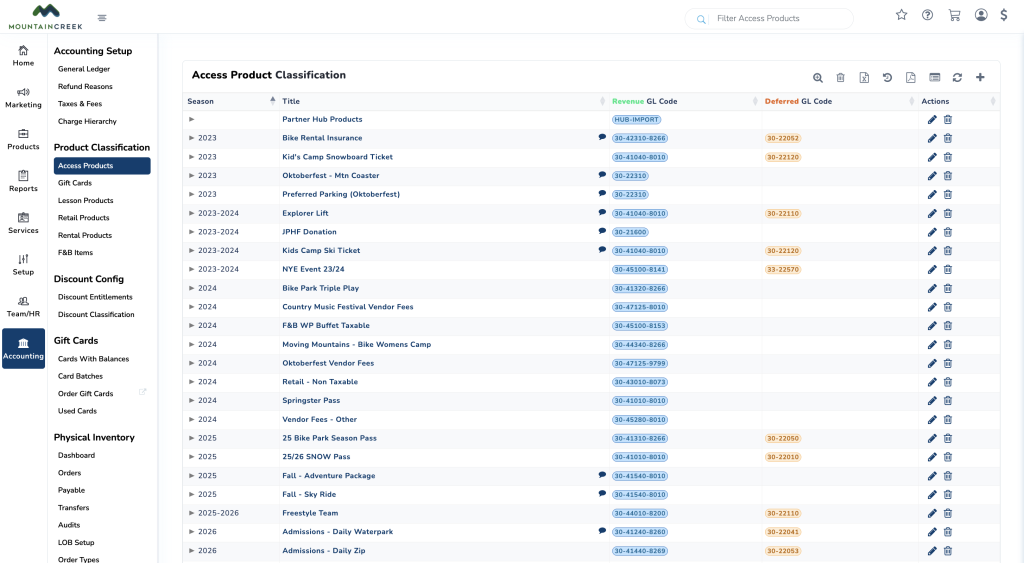
To create a product classification:
- From the left-side menu, select Accounting
- Locate the Access Product section and select the product type that best suits the new classification
- Press the plus (+) button in the top-right corner
- Fill in the following fields:
- Season — the time period for which the classification is valid. For products available across multiple seasons, select Any
- Class Title — the internal name of the classification. This appears in the system but is not visible to guests
- Class GL Code — select the GL code associated with this classification from the dropdown (see Section 3 if the code has not been created yet)
- Description (optional) — additional context for other administrators
- Pass-along Credit Card & SnowPay Fee (CCSP) to Consumer (optional) — enable this setting to pass credit card and SnowPay processing fees along to the guest at checkout
- Additional fields — depending on the product type selected, additional fields may be available. For example, Access products include an Activities field
- Select Save New Class
Note for operations teams: Product classifications drive how sales are categorized in reporting. Use clear, consistent naming so financial reporting reflects the operation’s actual product structure.